Importing an ActiveX control into Visual Studio (VB.NET)
This is a description of how to import an ActiveX control into Visual Studio. It is intended for users of the csXImage control but many of the principles apply generally to ActiveX controls and Visual Studio. The descriptions and screenshots are taken from Microsoft Visual Studio Express 2012 for Windows Desktop. The exact details will vary with other Visual Studio versions.
csXImage is supplied as an executable installation file (both the full and trial versions) and when this has been run it will unpack the files into the folder "c:\Program Files\Chestysoft\csXImage" or "...\csXImageTrial". It will also register the control. The important files are the control itself, csXImage.ocx or csXImageTrial.ocx, and the licence file, "csXImage.lic" or csXImageTrial.lic". There are two copies of each of these files, one for the 32 bit version and one for the 64 bit version, and they are copied into sub folders "\x86" and "x64"
Some controls are supplied without an installer and then the .ocx file must be registered using the command line tool regsvr32.exe or with our utility DLLRegSvr.
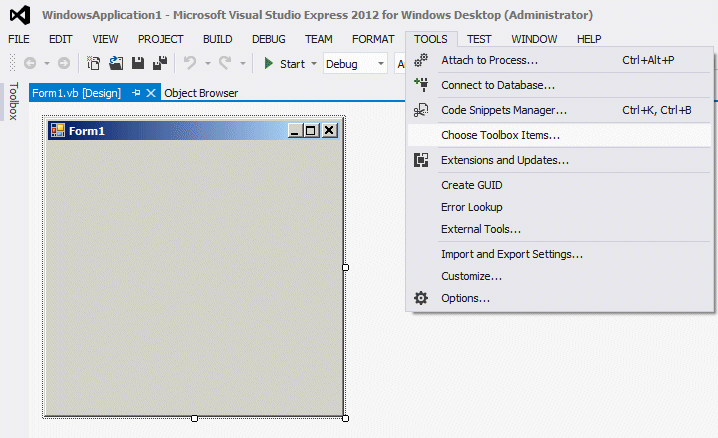
To use the control in a Visual Studio project it must first be added to the Tool Box. Select "Choose Toolbox Items..." from the Tools drop down menu or by right clicking on the Tool Box itself.

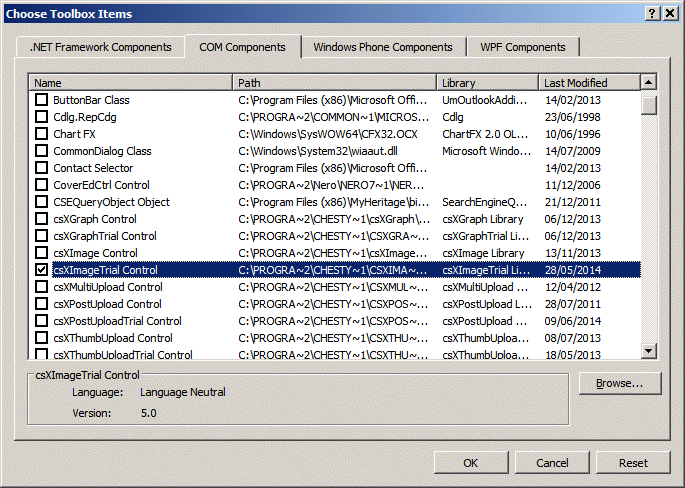
The "Choose Toolbox Items" dialogue box has four tabs and the second shows COM Components that are registered on the system. Tick the box for csXImage. The trial version is shown in the image below.

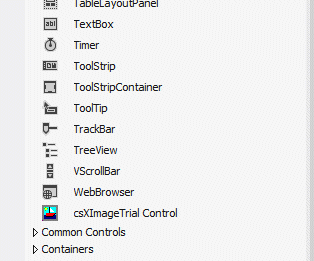
After clicking the OK button the control will appear in the Tool Box and it can be added to a form like any other control.

As a quick test you can import a csXImage control and a button and run the following code in the button click event handler:
Private Sub Button1_Click(sender As Object, e As EventArgs) Handles Button1.Click
AxImageBox1.LoadDialog()
End Sub
The default name for a csXImage object when it is placed on a form is AxImageBox1. This can be changed in the Properties box at the right hand side of the IDE. This code calls the LoadDialog command which allows the user to select and load an image from disk.
Interop Assemblies
Importing an ActiveX control to a Windows Forms .NET project causes two files to be created automatically by Visual Studio. These are the Interop Assemblies and they will be created in either the "\obj\Release" or "obj\Debug" folder, under the application folder. For csXImage they will be called "AxInterop.csXImage.dll" and "Interop.csXImage.dll". These files act as wrappers for the ActiveX control and enable .NET to access the methods and properties. They should not be confused with COM components and they are not registered.
Licence Files (.lic)
csXImage is a licensed control, which means it is supplied with a licence file which is required at design time but not at run time. In the case of csXImage, it allows the control to be used in a project and then distributed royalty free, because the end user of the application is unable to create their own projects with the control because they have the .ocx file but not the .lic. A licensed control cannot be imported into a project unless the licence file is in the same folder as the .ocx file.
The csXImage installer copies the licence file into the same folder as the registered OCX file. If an existing project suddenly starts to generate an error saying "You must have a license to use this ActiveX control", it could be because the OCX file has been registered again on the development machine at a new location. This can happen if an installer is run to deploy an application that uses the control.
32 bit or 64 bit?
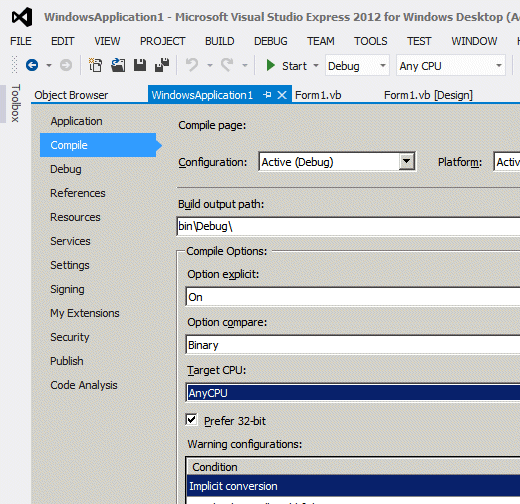
Most versions of Visual Studio can produce 32 bit or 64 bit applications. This can be controlled from the Compile page in Project Properties by changing the value for "Target CPU".

To check which version of the csXImage control is actually being used by the application, display the about box from your code. This will indicate whether it is the x86 or x64 version.
AxImageBox1.AboutBox()
In many applications it will make little difference which version is used. However, in a Twain application that uses a scanner, it will affect which devices are available. A 32 bit application can only use a 32 bit scanner driver and a 64 bit application can only use a 64 bit scanner driver. Similarly, if there are any other dependencies in the application, including calls to a database driver, there must be no mixing between 32 and 64 bit.
.- VB.NET examples using csXImage.
- Summary of VB.NET related pages.
- Loading, saving and adding effects - The VB.NET demo supplied with the trial.
- Zoom - An example of zooming an image.
- File Info - An example of editing IPTC text and EXIF data.
- Rubber Band - Drawing a line with "Rubber Banding".
- Selecting an area - Drawing a selection area with "Rubber Banding".
- Unicode - An example of adding text to an image in Unicode characters.
- TWAIN - An example of capturing an image from a TWAIN compliant scanner or camera.
- ADF - An example of scanning multiple images from a scanner with an Auto Document Feed.
- Multi-page TIFF - View edit or scan multi-page TIFF images.

